photoshop type tools
Photoshop provides you with great options to add texts to your artwork. You can customize the general appearance of the texts like font type, font style, font size, font color, anti-alias and even text orientation. You can even warp the text or use paragraph options to justify them. Overall, photoshop provides all the options to customize texts that you can find on any other text editor applications.
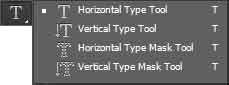
Horizontal Type Tool
Horizontal type tool allows you to type in a horizontal straight line. You can even confine the textarea to add multiple lines on texts as paragraphs with a simple click and drag action to create a textbox. While adding texts inside a textbox, you can use text alignment options like left align, center align or right align as well.
Options
As stated earlier, type tools allows you to customize your texts with a huge number of options on the options bar. Lets have a look at them.

Toggle Text Orientation
This option allows you to toggle the text orientation from horizontal to vertical and vice-versa.
Font Family
This option allows you to choose from a dropdon of huge library of font family present in your operating system. You can add to or remove any font from the system and the font will appear or disappear from photoshop too.
Font Style
This option allows you to choose from the narrow font to italic and bold black style for you font. This option is not supported by all font families though.
Font Size
This option lets you choose from 6 pts to 72 pts as font size from the drop down. If you need any size smaller or larger than the dropdown offers, you can type the value in the field manually. It supports any font size within the range of 0.01 pts to 1296 pts. You can even drag the font size icon on the left of the input field left or right to get the font size reduced or increased.
Anti-alias
This option allows you to make the edges of your texts smooth. The options available on the dropdown are none, sharp, crisp, strong and smooth.
Text Alignment
This option allows you to align the texts when added inside a textbox. If text is added without defining a textarea then it takes the initial point of the text as the reference point for alignment. So, if you choose right alignment, it'll appear on the right side of the initial point. If you choose center alignment, the the start point would become the center point of the text and if the option chosen happens to be left alignment, it'll appear as the left end of the text. For better alignment, texts should be added inside a textbox which is totally unnecessary if you need to add a single word or two and move them around.
Color
This tool allows you to define the color of the entire texts on a layer or the selected ones from the layer.
Text Warp
This option allows you to bend or twist texts out of shape to give a different look. It's only available after some text is added on the text layer. You can choose any of the warp styles available or modify one of them to create a customized one. You can control the orientation, bend amount and distortion amount on the warp styles.
Toggle Character and Paragraph Panel
This option allows you to toggle the character and paragraph panel where you can find some of the options form the options bar as well as number of additional styling options.
Character Panel
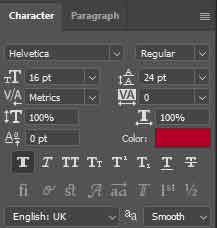
This panel allows you to control the appearance of the text characters of the active text layer. Font family, style, color and anti-alias options are available on the options bar too. Lets have a look at the other options.
Leading
This option allows you to define the height of the lines within a paragrap that helps to create a fine space between the lines. The standard leading value is 1.6 times the font size.
Kerning
This option allows you to define the spacing between two characters either side of the cursor within the text. Any value between -1000 to 10000 is accepted as the distance metrics between the two text characters, one on the left side and another on the right side of the cursor.
Tracking
This option allows you to add space behind the selected character which can be one or more at a time. It also supports any value between -1000 to 10000.
Vertically Scale
This option allows you to scale one or more characters or the entire paragraph vertically. The default value is 100%.
Horizontally Scale
This option allows you to scale one or more characters or the entire paragraph horizontally. The default value is 100%.
Baseline Shift
This option allows you to shift the base line of one or more selected characters or the entire paragraph. It generally moves the selected characters upwards or downwards from the normal baseline.
Font Styles
This option lets you stylize the fonts like making them bold or italic which is more useful while using fonts that don't support such styles. The options are stated below.
- Faux Bold - adds fake bold style to the font.
- Faux Italics - adds fake italic style to the font.
- All Caps - capitalizes all the characters.
- Small Caps - capitalizes all the characters by converting the small letters into small caps.
- Superscript - shifts the baseline of selected characters upwards to display them as superscripts.
- Subscript - shifts the baseline of selected characters downwards to display them as subscripts.
- Underline - adds underline below the selected characters.
- Strikethrough - adds a line that passes through the vertical center of the selected characters.
Open Font Styles
The open font style options are available for open type fonts which are the fonts that are universally supported on all operating systems. These fonts are symbolized with an 0 in front of their names in the font family dropdown. Specific options are available for each open type fonts.
- Standard Ligatures - replaces typography for specific pairs of characters that follows f or t in some of the font families.
- Contextual Alternates - joins specific characters in some of the font families.
- Discretionary Ligatures - also replaces typography for specific pairs of characters that are placed in front of t etc in some of the font families.
- Swash - replaces texts with glyphs in some font families.
- Stylistic Alternates - replaces specific characters like a or g with another styled character in some font families.
- Titling Alternates - formats large sized titles in some font families.
- Ordinals - formats characters with superscript characters.
- Fractions - formats numbers separated by slash.
Dictionary
This option allows you to use dictionary of certain languages for hyphenations and spelling corrections.
Paragraph Panel
Paragraph panel is highly useful while working with paragraph texts in photoshop. The options left align, center align and right align are already discussed, so, you'll find the rest of the options explained here.
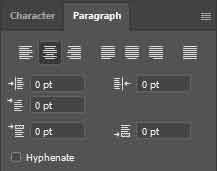
Justify Last Left
This option allows you to justify the paragraph where the last line of the paragraph is aligned to the left in case it is short.
Justify Last Center
This option allows you to justify the paragraph where the last line of the paragraph is aligned to the center in case it is short.
Justify Last Right
This option allows you to justify the paragraph where the last line of the paragraph is aligned to the right in case it is short.
Justify All
This option allows you to justify the paragraph where the last line of the paragraph is justified by adding spaces in case it is short.
Indent Left Margin
This option allows you to add intentation to the left of the paragraph.
Indent Right Margin
This option allows you to add intentation to the right of the paragraph.
Indent First Line
This option allows you to add left intentation to the first line of the paragraph.
Add Space Before Paragraph
This option allows you to add space before the paragraph where the first paragraph is an exception.
Add Space After Paragraph
This option allows you to add space after the paragraph.
Hyphenate
This option allows you to break words while justifying paragraphs and use hyphenation in such places.
How to use type tool?
Once you select a type tool and click on the workspace, regardless of whether you type anything or not a new type layer gets created. Cancel the type action if you need to make any changes on the options bar and avoid those unnecessary layers to get a clean design. It's always better to create a textbox before adding texts and you can do that easily with the text tool itself with a simple click and drag action. Any changes made on the options bar while the text type cursor is still active on the textbox won't make any changes on the texts already typed but the ones typed after the changes will be affected. In order to change the appearance of the texts already typed, you can click on the Check Mark at the end of the option bar before making changes or select all the typed texts and do so.
You can move the text layer while the cursor is still active by moving your mouse a little far away from the text. The type cursor will change into move tool and hence can click and drag the text layer.
You can select the type tool, make necessary customizations and then click on the document area and start typing. The texts will be placed in their own layer i.e. the text type layer which is a vector shape.
Vertical Type Tool
This tool is a variation of horizontal type tool which allows you to type in a vertical column that places only one letter in a row. The only difference is the alignment options where the options left, right and center align are replaced by top, bottom and center align. In the paragraph panel too, the justification options are replaced by top, bottom and center justification options.
Horizontal Type Mask Tool
Horizontal type mask tool is used to create selections in the shape of texts. Initially, it looks like a text tool and you can type too. But, once you commit the type action, it'll convet itself to text selection which can be used as a layer mask to create text effects with images. It is identical horizontal type tool in terms of options on the options bar.
How to use type horizontal type mask tool?
Select horizontal type mask tool and click on the document area once you have customized the text options from the options bar. The background color will change. Add texts to your document and commit changes. Assoon as you commit the changes, it'll be converted into selections. Click on Add Layer Mask option from the bottom of the layer panel and you'll see the layer below the text is hidden while the text is filled by the subjects from that layer.
It allows you to type texts without any color as it gets filled with the background image or pattern as its background. Once you finish typing above a background, select Add Layer Mask option from the bottom of the layer panel and your text will take the background image as its color. It's highly used in magazines to give extra ordinary looks to the text.
Vertical Type Mask Tool
Vertical type mask tool functions similar to the horizontal type mask tool but the text orientation in this case is vertical with one character in a row.
Leave a comment