photoshop layers
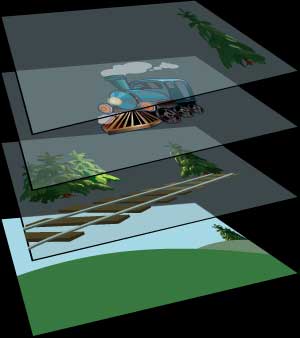
Photoshop layers function like the sheets of stacked glasses where the lower level layers are visible through the transparent areas of the layers on top of them. A layer can be moved to position it's content like sliding a sheet of glass in the stack while changing opacity of a layer also makes content below it partially transparent.
You can use multiple layers to perform tasks such as compositing images, adding text to an image or adding graphic shapes. You can apply a layer style to add special effects to a particular layer without affecting the others too.
Understanding and Organizing Layers
Understanding of the layers is very important in photoshop which helps you to create great artworks without destructing the original documents. It allows you to add styles or adjustments, nest, rename, duplicate, merge or organize layers and many more. The background layer is locked by default in the layers panel which you can unlock with a double lick on the lock icon.
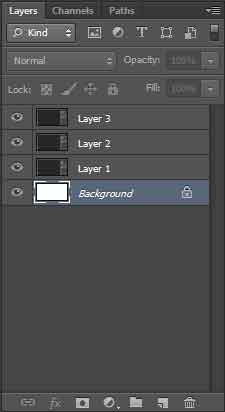
Layers Panel
The Layers panel lists all layers, groups and effects. You can use the layers panel to show and hide layers, create new layers and access other options. You can go to Windows » Layers to enable the layers panel. Lets have a look at the layers panel interface.
Layers Panel Settings
This option is located on the top right corner of the layers panel as some bars behind a small triangle. It'll provide you with the options like new layer, duplicate layer, delete layer, delete hidden layers, new group, new group from layers, lock all layers in a group, convert to smart object, edit contents, blending options, edit adjustments, create clippping mask, link layers, select linked layers, merge down, merge visible, flatten image, animation options, panel options, close and close tab group. Lets have a look at each of them.
- New Layer - makes a new layer dialog box pop up on the screen where you can define the name of the layer and choose the color, blend mode and opacity and create a new blank layer. The color would be added on the visibility icon which makes the layer distinct from others. An empty layer is represented by checkerboard pattern.
- Duplicate Layer - duplicates the active layer.
- Delete Layer - deletes the active layer.
- Delete Hidden Layers - deletes all the hidden layers or the layers with visibility checked off at once.
- New Group - creates a new empty group.
- New Group From Layers - creates a new group and the selected layers will be placed inside it.
- Lock All Layers in a Group - locks all the layers within the selected group with the lock chosen from the dialog box that appears.
- Convert to Smart Object - converts selected layer or group into smart object that gets along with image resizing. The smart objects can't be edited directly on the document but opens in a new document instead where you can make the changes and that'll be loaded in the actual document.
- Blending Options - allows you to add styles to the selected layers which will be explained in Photoshop Layer Styles.
- Edit Adjustments - allows you to edit the adjustment layers.
- Create Clipping Mask - clips a layer's content that extends the boundary of the layer to which it is clipped. It produces great results when some large images are clipped inside frame shapes.
- Link Layers - links multiple layers which can't be moved separately.
- Select Linked Layers - automatically selects layers linked to the active layer.
- Merge Down - merges the active layer with the layer below it. If group is selected instead, it'll show merge group option that merges all layers inside that group.
- Merge Visible - merges all visible layers into a single layer.
- Flatten Image - merges all visible as well as hidden layers into one single layer.
- Animation Options - allows you to unify the animations attributes to all frames within a layer while working with animation frames which you can see on the Photoshop Animations section.
- Panel Options - allows you to redefine the thumbnail size, content and a few more attributes for the layers.
- Close - closes and hides the layer tab from the layers panel.
- Close Tab Group - closes and hides the entire layers panel.
Layer Filters
Layer filters allow you to search for specific layer with great convenience when the layer panel has huge number of layers. You can search the layers by their kinds like layer name, layer style, blend mode, attribute or color from the dropdown. You can also search for layers of specific type like pixel layer, adjustment layer, type layer, shape layer or smart object by clicking on the related icons on the filter bar.
Layer Blend Modes
Layers panel also allows you to add blend mode to the entire layer directly from the panel itself. You can flick through the modes and select the best blend option you are pleased with.
Layer Opacity
Opacity allows you to control the transperancy of entire contents along with layer styles of the active layer.
Layer Lock
Layer lock allows you to lock certain features of a layer. The options are stated below.
- Lock Transparent Pixels- disables modification of transparent areas of a layer.
- Lock Image Pixels - disables modification of image pixels of a layer.
- Lock Position - disables movement of a layer.
- Lock All - disables any modification on a layer.
Layer Fill
Fill allows you to control the transperancy of the pixel contents only from the active layer.
Layer Visibility
This option controls the visibility of a layer as it shows or hides a layer. Click on the eye icon to change the visibility.
Layer Thumbnail
Layer thumbnail gives you a quick view of the layer contents.
Layer Name
This option allows you to keep the layer easily identifiable. You can double click on the layer name to rename it.
Link Layers
It's a quick option to link layers.
Layer Styles
It provides the dropup for layer styles which are explained in Photoshop Layer Styles.
Add Layer Mask
This option allows you to add a mask on top of the layer which you can use to control the visibility of the portions of the selected layer using a paint brush. The foreground and background color swatches convert to black and white while the layer mask is filled with white color. You can change the fill color of the layer mask to black by hitting CTRL + I and then paint with the white color to control visibility or simply use the black color for brush while the layer mask is white.
Add Adjustment Layer
This option allows you to add a new adjustment layer that stays on top of the selected layer. You can control the color balance of the desired layer without actually edit it with the help of adjustment layers.
Create Layer Group
This option allows you to create a layer group quickly. You can click on the layer group icon which inserts a new layer group in the layers panel, rename it if you like and then drag the desired layers into the group to keep them organized. The layers will be placed in heirarchial order inside the group where the first layer to be dragged inside will be on the top while the last one will be placed at the bottom of the group. You can drag those layers up or down to rearrange their orders,
You can also select desired layers and then drag then to the layers group icon and release in order to put them inside a group or simply select the layers and hit CTRL + G to put them inside a group.
Add New Layer
This option allows you to add a new layer in the layers panel quickly or you can also use the keyboard and hit CTRL + SHIFT + N that'll make a create new layer dialog box pop up where you can define the name of the layer and choose the color, blend mode and opacity and create a new blank layer.
Delete Layer
This option allows you to delete a layer or a group. You can select the layer and then click the trash icon to delete them or simply drag them to the trash icon and release to get deleted. Keyboard keys DELETE or BACKSPACE can also be used to delete a layer or a group.
Layer Options
Options for a specific layer can be obtained with a right click on the layer names or further right while clicking on the thumbnail will display another set of options. Some of them are already explained lets have a look at the other ones.
- Rasterize Layer - converts a shape or type layer into pixel layer.
- Rasterize Layer Styles - rasterizes layer styles.
- Disable Layer Mask - disables the layer mask.
- Disable Vector Mask - disables the vector mask.
- Copy Layer Style - copies styles from a layer.
- Paste Layer Style - pastes copied styles to another layer.
- Clear Layer Style - clears styles from a layer.
- Copy Shape Attributes - copies attributes like color, stroke size and style form a shape.
- Paste Shape Attributes - pastes attributes of from one shape to another.
- List of Colors - marks the visibility icon of a layer with defined color that helps to identify or search them quickly.
- Select Pixes - selects the entire pixel area of a layer. This can be obtained with CTRL + Click on the thumbnail icon of any layer.
- Transperancy Mask Options - allows you to add to, subtract from or intersect transparency mask to the layer.
- Thumbnail Options - allows you to choose between the size of thumbnails on the layers panel as well as either to display them or not.
- Clip Thumbnails Options - allows you to choose the clipping mode of the thumbnail graphic. It allows you to choose from either to display the graphic that's inside the document or display the whole object part of which might be beyond the document size.
Layer Mask Options
Layer mask also provides you with some options in a dropdown which you can obtain with a right click on the layer mask on the layers panel. The options are stated below.
- Disable Layer Mask - disables a layer mask.
- Delete Layer Mask - deletes a layer mask.
- Apply Layer Mask - rasterizes the layer mask.
- Add Mask To Selection - adds the layer mask to selection.
- Subtract Mask From Selection - subtracts layer mask from selection.
- Intersect Mask With Selection - selects the intersected area only as selection.
- Refine Mask - allows you to refine the edges of the layer mask.
- Mask Options - allows you to redefine the color of the layer mask.
Leave a comment