photoshop move tool
The move tool is used to move the objects or layers around the document area in photoshop. In order to be able to use photoshop application efficiently and create any artwork like logos, banners, visiting cards, greeting cards or website mockups, it's very important to understand and use the photoshop tools, especially, those tools on the tools bar. And, the very first tool on the tools bar list is the move tool. Let's start with it then.
Learn Photoshop Move Tool By Watching Video

The move tool is used to move the objects or layers around the document area in photoshop. You can click on the object on the document layer and move the layer selected on the layer panel but the thing to be reminded here is that the layers with Position Lock or Lock All can't be moved without disabling their locks. The locks must be disabled before moving those objects.
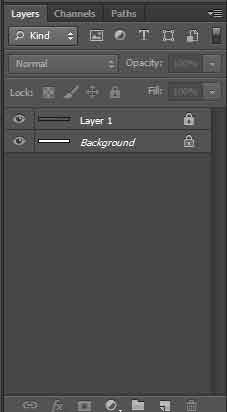
The first object opened in the photoshop is locked with the Lock All lock by default which can be disabled by a double click on the lock icon beside the layer name on the layers panel and then converting it to layer 0 form the dialog box that appears whereas other locks which are put manually can be disabled by a click on the selected lock icon from the lock lists. Here's an example of locked layers.
Move Tool Options
With the selection of move tool, the option bar will display multiple options as shown below.

Tool Preset Options
The first option on the left is the tool preset options which is available for each tool selected where additional options for the tool if available are displayed. You can select any one of the preset available as per your need but, in case of move tool, there's no preset options.
Auto-Select
The auto select option allows you to move the objects from the document area without specifying the layer you want to work on on the layers panel as it'll automatically select the same layer as active on which you click.
Auto select option is followed by another option that lets you choose between the layer and the group. The layer option is selected by default which instructs the application to select the layer automatically that is being clicked or dragged in the document area. If the group option is selected, it'll select the group op layers as sctive and move the entire group of layers instead of a single one. In cases where group option is selected but no group exists, it'll auto select the layer itself.
Show Transform Controls
Show transform controls option if checked will display transformation handles for the active layer which is quite useful to quickly transform the size or orientation of a layer.
Alignment Options
Move tool also provides us with alignment options which are disabled by default. These options are grouped into 4 further sub groups namely Vertical and Horizontal Alignment, Vertical and Horizontal Distribution and Auto Alignment.
Vertical and Horizontal Alignment

These options are available once you make a selection within the document area as a reference area for alignment. If you need to align the layers in reference to the entire document area, you can use CTRL + A to select the entire document area while in other cases you need to create a selection area by choosing one of the selection tools and drawing a selection area within the document.
Once the selection is made and the layer to work upon is selected as active layer, all the horizontal and vertical alignment options will be enabled as shown below.
The first three options are the vertical alignment options. The first one will align the selected layer vertically on the top while the second one will align it vertically on the center and the third one will align it vertically at the bottom of the selection area.
Next three options are the horizontal alignment options. The first one will align the selected layer horizontally on the left while the second one will align it horizontally on the center and the third one will align it horizontally on the right of the selection area.
Vertical and Horizontal Distribution

These options would be enabled once three or more layers on the layers panel are selected. You can hold the CTRL key and click on multiple layers on the layers panel to select them manually or use SHIFT key and click on two layers to define the first and last layer of the selection where all the layers between those two layers are selected automatically.
The first three options are vertical distribution options. The first one will space the selected layers evenly from the top depending upon the pixel value of each layer while the second one will space them from the center and the third one will space them from the bottom.
The next three options are horizontal distribution options. The first one will space the selected layers evenly from the left depending upon the pixel value of each layer while the second one will space them from the center and the third one will space them from the right.
Auto Alignment
The auto alignment options are enabled once two or more layers are selected.

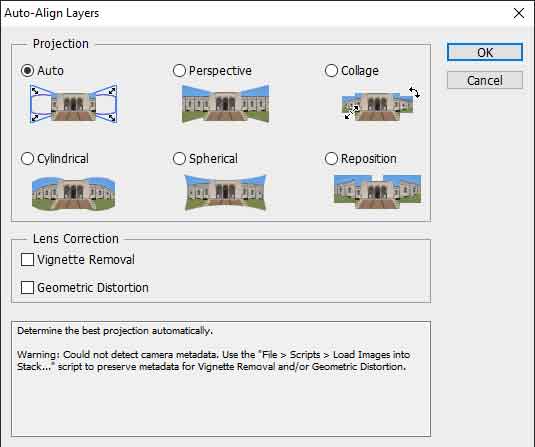
This option can align layers automatically depending upon the contents on the selected layers and their similarity. You can set a reference layer by locking it or let photoshop choose the reference layer itself and then choose the auto-alignment option to get them aligned. The layers must have around 40% common or overlapping contents to let photoshop align them automatically. The options available for auto correction are as follow.
- Auto Allows photoshop to analyze the contents on the layers and choose between cylindrical or perspective alignment to produce a better composite.
- Perspective Designates one of the layers as the source image (middle one by default) and transforms or repositions other layers to create a consistent composition.
- Cylindrical Displays each image aligned as an unfolded cylinder while placing the reference layer at the center and creates wide panaroma effect.
- Spherical Displays each image aligned spherically while placing the reference layer at the center and creates spherical panaroma effect.
- Scene Collage Displays selected layers as collage while keeping the reference layer in the center and matching overlapping contents.
- Reposition Displays selected layers by repositioning them on the basis of matched contents where the reference layer is placed at the center.
Lens Correction
Lens correction options are available for some of the auto alignment options which aim at reducing glitches caused by lens defects.
- Vignette Removal Rectifies lens defects and makes the edges of the images darker than the central areas.
- Geometric Distortion Rectifies distortions in the images caused by lens defects.
Here's the image of auto alignment options.
Leave a comment