photoshop interface
Adobe Photoshop is a graphics editor developed and published by Adobe Inc. It was originally created in 1988 to edit raster graphics by Thomas and John Knoll. Overtime, photoshop has become the industry standard not only for raster graphics editing but also for vector graphics as well as digital art.
Photoshop can edit and compose raster images in multiple layers and supports masks, compositing and several color modes including RGB, CMYK tow of the most commly used color modes. Photoshop uses its own PSD and PSB file formats to support these features.
In addition to raster graphics, photoshop can also be used to edit or render text and vector graphics along with 3D graphics and GIF animations.
In webtrickshome, we will be focusing on photoshop for mainly two purposes i.e. graphic design and web design. We will also go through the details about creating animation gif using photoshop.
The first step of creating a website starts with a mockup design built that we can build with the use of photoshop. However, Adobe XD has emerged to be more popular of late for that purpose. It gives us a clear picture about the website being built before the actual coding begins. All the color themes as well as fonts, navigations, buttons and other interface elements are developed in phtoshop to imitate a fully functional website.
It'll be much easier to view the outlook of the website within a few hours and much more convenient to make changes in photoshop rather than scrapping all those html and css files when the actual coding has been done and your client isn't happy with the design.
Hence, in order to save your time and effort while designing a website, it's better to start with the mockups rather than doing all those html, css and js works before the layout is finalized.
So, Let's start with the photoshop tutorials to reach the coding level in web design or learn it purely for graphic designing.
Don't want to read the article on photoshop interface ? Here's a video tutorial, if you would like to see a video instead.
Photoshop Interface
Before we start learning about the photoshop tools, templates and images, it's good to have a general knowledge about the interface of photoshop. Here's a picture of photoshop interface.
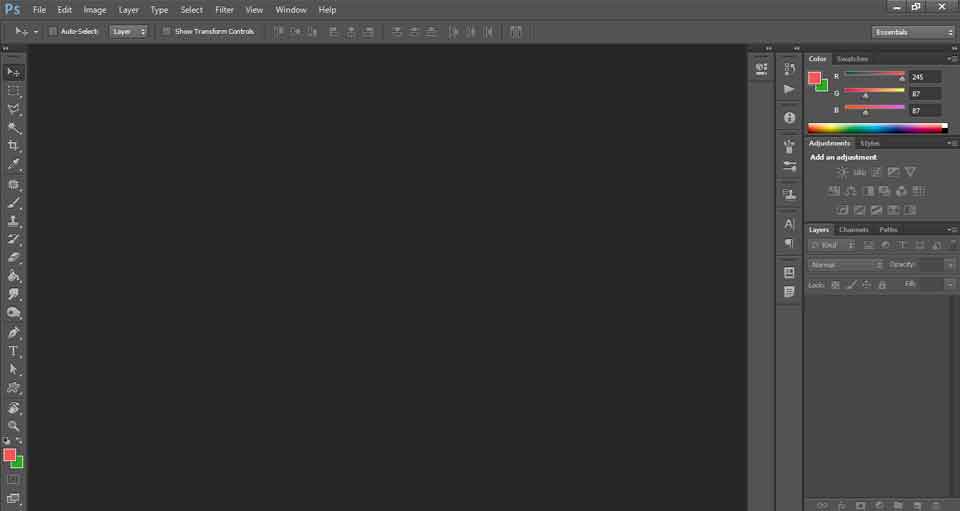
Menu Bar
As seen in other applications, Menu bar contains multiple options for creating, editing, saving and printing the document along with modifying the tools view and help options. Photoshop also provides separate menus for typing texts, formatting photoshop layers, making selections and adding filters. We'll go through each of them in the latter part of this lesson.
Tools Bar
Photoshop has a tools bar on the left of the window that makes all the works easier as you don't need to navigate through the menu bar to find the tools that you need on a regular basis to move, select, crop, paint, etc. You can easily edit the tools bar view from Edit > Preferences from where you can add or remove the tools to/from the tools bar. We'll go through each of them on the next lesson.
Document Tab
Photoshop allows you to open and work on multiple documents at a time. All the documents currently opened are visible as tabs on top of the document area. You can toggle among the documents by clicking on those tabs and work on multiple documents with greater ease.
Options Bar
Most of the tools available in photoshop can be customized as per the requirement and you can find all the options to customize a tool on the options bar once the tool is selected.
Panels
Depending upon the document you are working on, you might need different panels for quick view and convenience and photoshop offers a great space to display some of them as per your need on the right hand side of the document area. The most important one would be the layers panel that displays the list of layers your artwork contains while allowing you to select or re-order the layers as per your need along with a collection of actions you can perform over those layers. Let's have a closer view on that one.
Layers Panel
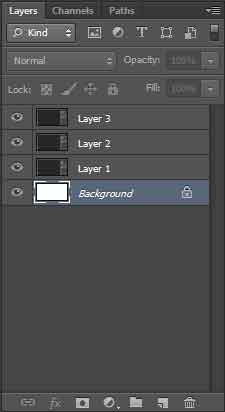
Layers panel helps you organize your document layers that can be viewed and edited as individual units. It lets you control the outlook of your document with greater convenience. Let's have a look at the options available at the layers panel.
- Layer Visibility The eye shows that the layer is visible. You can click on the eye icon to turn the layer visibilty on or off.
- Layer Locking Options You can restrict the modification of layer with the layer lock options. Checkered square icon locks transparency of the layer while the brush icon locks the image, the arrow icon locks the position of the layer and the lock icon locks all options.
- Layer Blending Mode Choose a particular blending mode from the drop-down menu to make the selected layer blend as you like with the layers beneath it. The default value is Normal here.
- Fill / Opacity Lets you specify the transparency of the layer by typing in some values or dragging the slider.
- Layer Options Menu Located at the top right section of the layers panel, this menu allows you to select multiple layer options. Some of them are displayed as icons at the bottom of the Layers panel as well.
- Link Layers The first option at the bottom of the layers panel. It allows you to link multiple layers so that you can move or transform those linked layers together.
- Layer Styles Allows you to add various visual effects to the selected layer.
- Layer Mask Allows you to show or hide certain parts of the layer with the use of paint brush.
- New Fill or Adjustment Layer Creates a new layer that can be used as individual layer in the document but effects will be applied in the layer beneath it.
- New Group Allows you to organize document with multiple layers where you can group different layers into a folder just like you do in file explorer.
- New Layer A shortcut icon to create a new layer in the document.
- Delete Layer A shortcut icon to delete a layer or a group of layers. You can drag the layers to the trash to get it deleted or select the layers and click on the trash icon too.
Leave a comment