
In this article, you'll learn how to work with ajax GET and POST method with examples that'll make yourlife easier as a developer ahead.
Interacting with server is a must when you are working on a server side language. You might have noticed that each time you send a data to the server or recieve one, the page needs to reload which might consume a considerable amount of time depending on the page size and the number of HTTP requests it sends to the server which is annoying from a user's point of view and it can sum up to bad user experience.
In such cases, ajax can be more useful to enhance user experience because it allows you to interact with the server without reloading the page. Depending upon the security need for the data being sent or the character length, you can either opt for either GET method or POST method. Here, you'll see how to interact with database using both methods with examples.
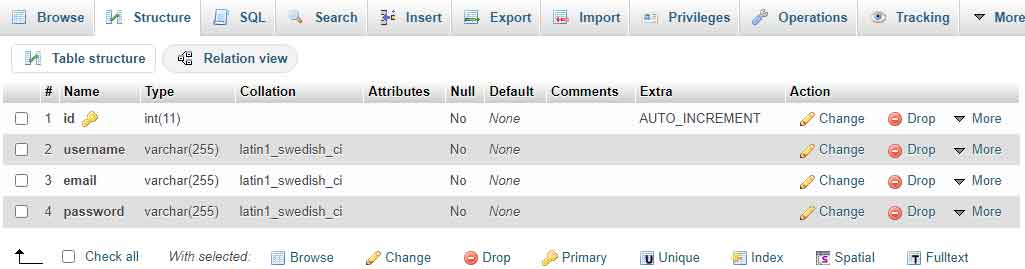
Database
The first thing, we'll need to work with ajax is the database. So, lets create one. I'll be creating a users table for demostration purpose along with a form to insert data. Here's my users table.
Frontend File
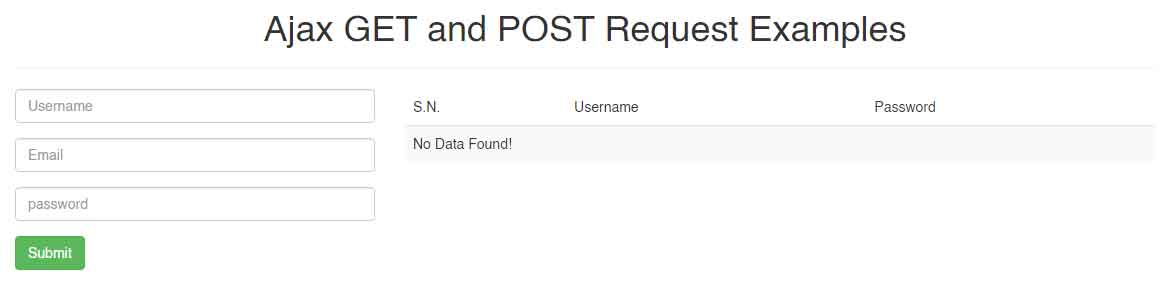
Here's the frontend file that I'm going to use. It's got a form on the left and a table to display users on the right. I've added bootstrap css file for convenience while also adding the jquery file which is required to work with ajax.
<?php
define('HOST', 'localhost');
define('USERNAME', 'root');
define('PASSWORD', '');
define('DATABASE', 'ajax_demo');
$connection = @mysqli_connect(HOST,USERNAME,PASSWORD,DATABASE);

if(!$connection): ?>
  <h1>Error in Database connection.</h1>
<?php endif; ?>

<!DOCTYPE html>
<html>
<head>
  <title>Ajax Demo</title>
  <link rel="stylesheet" href="bootstrap.min.css">
  <script src="jquery.min.js"></script>
</head>
<body>

  <div class="container">
    <h1 class="text-center">Ajax GET and POST Request Examples</h1><hr>
    <div class="row">
      <div class="col-sm-4">
        <div class="form-group">
          <input type="text" class="form-control" placeholder="Username"  id="username">
        </div>
        <div class="form-group">
          <input type="email" class="form-control" placeholder="Email"  id="email">
        </div>
        <div class="form-group">
          <input type="password" class="form-control" placeholder="password"  id="password">
        </div>
        <div class="form-group">
          <input type="submit" class="btn btn-success" id="submit">
        </div>
      </div>
      <div class="col-sm-8">
        <table class="table table-hover table-striped">
          <thead>
            <td>S.N.</td>
            <td>Username</td>
            <td>Password</td>
          </thead>
          <tbody id="userstable">
            <?php
            $sql = "SELECT * FROM users";
            $result = mysqli_query($connection,$sql);
            $datacount = mysqli_num_rows($result);
            if($datacount > 0):
              foreach ($result as $key => $user):
            ?>
            <tr>
              <td><?=++$key?></td>
              <td><?=$user['username']?></td>
              <td><?=$user['email']?></td>
            </tr>
            <?php endforeach; else: ?>
            <tr>
              <td colspan="3">No Data Found!</td>
            </tr>
          <?php endif; ?>
          </tbody>
        </table>
      </div>
    </div>
  </div>
</body>
</html>
The input fields are not wrapped by the <form> markup because we don't need it while sending data via ajax. Here's the initial look of the page before adding any data.
Ajax Reuest Method Get
Now, lets get to work with ajax GET method first. It's important to validate the form before submitting which is discussed earlier in the forum section under the title How To Display Error Message In Html Form With Javascript Without Using Alert? You can go through that topic for details. Here' we'll be focussing on the ajax part.
1. $( document ).ready()
Add a <script> markup before the closing </body> markup and add $(document).ready(function(){});. You can even add $function(){}; as a shorthand. This code prevents the codes inside it to be executed before the entire page is loaded completely including the css and js files along with images and iframes. Here's, the example on how it shoud look.
<script>
$(document).ready(function(){

});
</script>>
2. Get Input Values
Now, you need to retrieve the values on the event where submit button is clicked. To make the task easier, I've added ids to all the form elements including the button. So, my code would be as follows.
$('#submit').click(function(){
  var username = $('#username').val();
  var email = $('#email').val();
  var password = $('#password').val();
)};
Here, var is setting variables for values from each input fields that'll be sent for processing in a short while.
3. Form Validation
Form validation is one of the most important part while working on server side script. Here's a light form of validation. For more details, as stated earlier, please visit How To Display Error Message In Html Form With Javascript Without Using Alert? Here's my code for validation.
if(username.length < 3 || email.length < 5 || password.length < 5){
  return false;
}
Basically, I'm asking the javascript to count the character length of values added in each of the form fields and whenever the length is less than defined in any of those fields, the submit button will not work. You can add a bit more of validation code to display the error messages to the users.
4. Setting Up Ajax
Finally, it's time to setup ajax. The default request method is GET so you don't need to define the request method while sending data via this method. You need to define the URL of the page where the data will be sent for processing along with the data that is needed to be processed encoded in JSON format. Once the processing is completed, you can reload only a section of your page with updated data using ajax. Here's the code.
$.ajax({
  url: 'process.php',
  data: {username:username,email:email,password:password},
  success:function(data){
    document.getElementById('userstable').innerHTML = data;
    var username = $('#username').val('');
    var email = $('#email').val('');
    var password = $('#password').val('');
  }
});
The existing users data table inside the div with id userstable will be replaced by the updated data table sent from the file process.php and the values present in the form fields will be removed.
Ajax Script as a Whole
Here's the entire block of javascript code that I added to insert data to the database.
<script>
$(document).ready(function(){
  $('#submit').click(function(){
    var username = $('#username').val();
    var email = $('#email').val();
    var password = $('#password').val();
    if(username.length < 3 || email.length < 5 || password.length < 5){
      return false;
    }
    $.ajax({
      url: 'process.php',
      data: {username:username,email:email,password:password},
      success:function(data){
        document.getElementById('userstable').innerHTML = data;
        var username = $('#username').val('');
        var email = $('#email').val('');
        var password = $('#password').val('');
      }
    });
  });
});
</script>
5. Data Processing Code
You should know the data processing code well prior to learning ajax. So, here's the processing code without any explanations. You can follow this link for detailed tutorials on web development in php.
<?php
define('HOST', 'localhost');
define('USERNAME', 'root');
define('PASSWORD', '');
define('DATABASE', 'ajax_demo');
$connection = @mysqli_connect(HOST,USERNAME,PASSWORD,DATABASE);

if(!$connection): ?>
  <h1>Error in Database connection.</h1>
<?php endif;

$username = $_GET['username'];
$email = $_GET['email'];
$password = $_GET['email'];
$sql = "INSERT INTO users (username,email,password) VALUES ('$username','$email','$password')";
$result = mysqli_query($connection,$sql);
if($result):
  <?php
    $sql = "SELECT * FROM users";
    $result = mysqli_query($connection,$sql);
    $datacount = mysqli_num_rows($result);
    if($datacount > 0):
      foreach ($result as $key => $user):
        ?>
        <tr>
          <td><?=++$key?></td>
          <td><?=$user['username']?></td>
          <td><?=$user['email']?></td>
        </tr>
      <?php endforeach; else: ?>
      <tr>
        <th colspan="3">No Data Found!</th>
      </tr>
    <?php endif; ?>
<?php endif; ?>
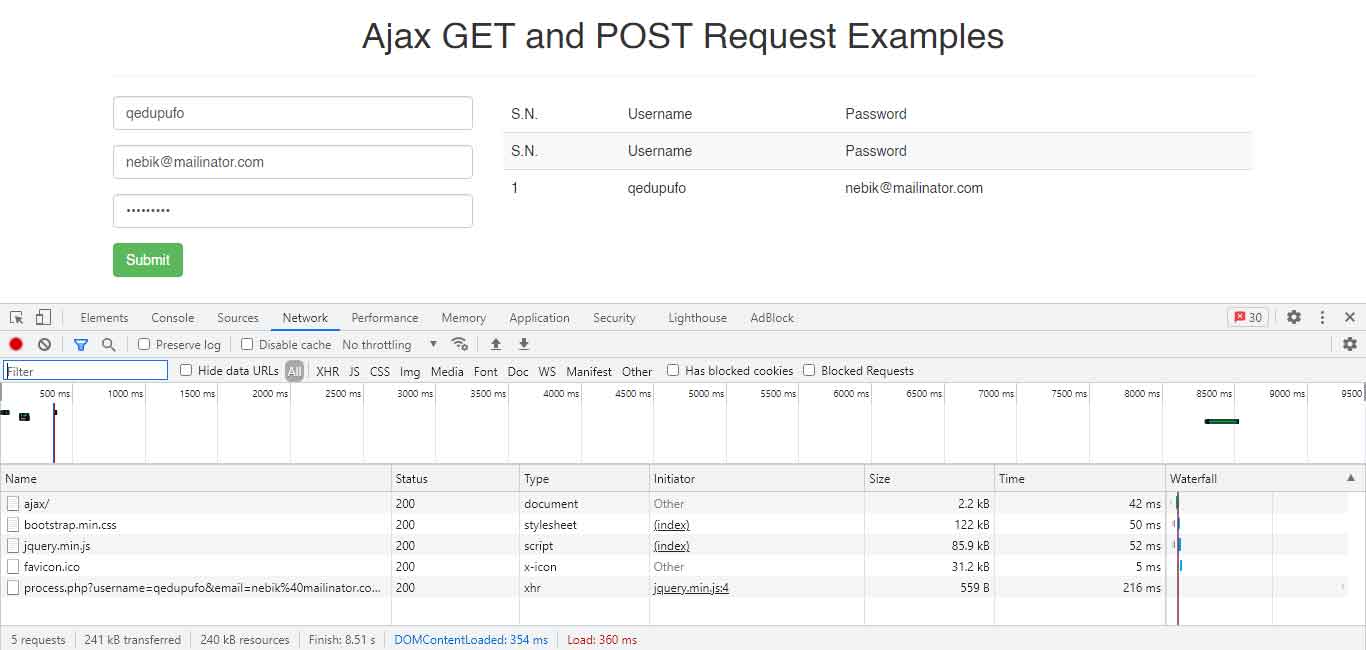
Once, you've added the processing code, filled up the form and clicked on the submit button, the data should be seen on the users table on the right. If not, check in the network section via inspect element on your browser and see the HTTP status. You can follow this link to find more details on HTTP Status Errors while in case of success it should look as shown below. That's all you need to do to insert data into database table using ajax GET method.
Ajax POST Method
You can see the data being sent via GET method in the console area in the image above where the data is concatenated at the end of the processing page's URL. If the data is a encrypted binary code that is too long and hence impossible to send via GET method which happens most of the time while working with images or you don't want to display the data in the console area, you can use ajax POST instead. You can visit this link for details about image handling with ajax in php while here's the basics.
Rest of the code will be exactly same to GET method except the requirement to define the request method in the ajax setup. Here's the example of ajax post method.
<script>
$(document).ready(function(){
  $('#submit').click(function(){
    var username = $('#username').val();
    var email = $('#email').val();
    var password = $('#password').val();
    if(username.length < 3 || email.length < 5 || password.length < 5){
      return false;
    }
    $.ajax({
      method: 'post',
      url: 'process.php',
      data: {username:username,email:email,password:password},
      success:function(data){
        document.getElementById('userstable').innerHTML = data;
        var username = $('#username').val('');
        var email = $('#email').val('');
        var password = $('#password').val('');
      }
    });
  });
});
</script>
You can use either method or type to define the request method while rest of the codes are exactly the ones used in GET method. Now, in the processing file i.e. process.php in this example, you need to replace $_GET by $_POST to retrieve the data being sent via ajax and you are done.
It's quite easy to use ajax for server side applications ehich helps to make it less annoying for users too. So, why won't you use Ajax GET or POST method in your applications from now onwards?
Like, share and comment on the post, if you liked it.
Leave a comment