04 Oct, 2019
How to send email via server domain email account in laravel ? Tweet
1 Answer 16705 Views

04 Oct, 2019
Sending email via domain email account or server from an application built on laravel is very easy. In fact, Laravel Mail recommends developers to use other APIs such as mailgun and sparkpost to send mail if possible as they are simpler and faster than SMTP servers. If you are thinking what SMTP stands for then it stands for Simple Mail Transfer Protocol, which is the standard protocol for email exchange on the internet. These API drivers need Guzzle HTTP library which can be installed via the Composer package manager.
composer require guzzlehttp/guzzle
However, sending mail via server's domain email account don't require that library. Here are the steps you need to follow to send mail via domain email account from an application built on laravel.
Get set up mail client credentials for your domain email account
Go to email accounts section on your cpanel and click on SET UP MAIL CLIENT option of the domain email account that you want to use to send email from your website which should be something like this.
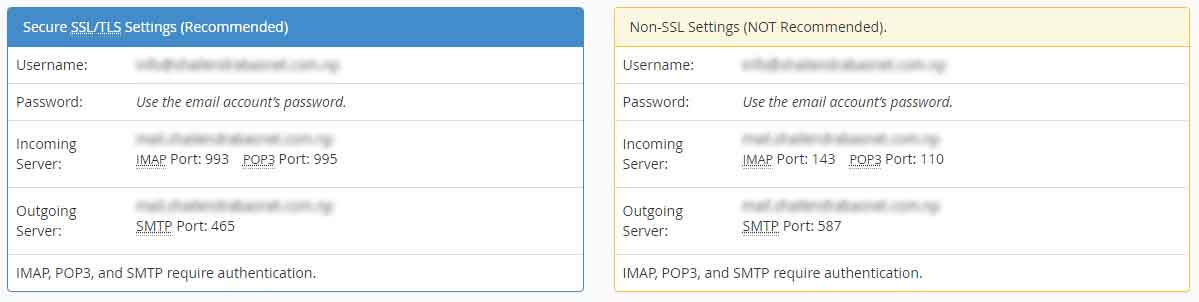
Configuration on .env file
MAIL_DRIVER=mail
MAIL_HOST=mail.yourdomaminname.com
MAIL_PORT=465
MAIL_USERNAME=mail@yourdomaminname.com
MAIL_PASSWORD=**************
MAIL_ENCRYPTION=tls
Sending a mail via Laravel application requires the details of the mailing address it's going to use. Define the sender address in MAIL_USERNAME and it's password in MAIL_PASSWORD fields. The MAIL_DRIVER will be mail and the MAIL_HOST will be the same shown in your mail settings outgoing server section. Define the MAIL_PORT as given in the settings details and the MAIL_ENCRYPTION as tls if you are using secured http connection or SSL for non secured connection. TLS stands for transport layer security that encrypts the email being exchanged to prevent it from being read by third parties across the server.
Configuration of config/mail.php
The same configuration needs to be defined in your config » mail.php configuration file as well. Mail won't be sent without the address defined in the 'from' array in this file. You can leave the username and password field undefined though.
'driver' => env('MAIL_DRIVER', 'mail'),
'host' => env('MAIL_HOST', 'mail.*********.com'),
'port' => env('MAIL_PORT', 465),
'from' => [
        'address' => 'mail@yourdomaminname.com',
        'name' => 'yourdomaminname',
    ],
'encryption' => env('MAIL_ENCRYPTION', 'tls'),
'username' => env('MAIL_USERNAME'),
'password' => env('MAIL_PASSWORD'),
Mailable Class
Laravel requires a mailable class for each mail you create in your application which is stored in app » Mail directory. You can create a mailable class through composer. Here, we are creating a mailable class named customMail.
php artisan make:mail customMail
Each mailable class will contain a constructor method and a build method as shown below. The constructor() method is used to retrieve the public data that is made available from your other controllers to integrate in the mail while build() method is used to call various inbuilt methods like from, subject, view, attach, etc.
<?php
namespace App\Mail;

use Illuminate\Bus\Queueable;
use Illuminate\Mail\Mailable;
use Illuminate\Queue\SerializesModels;
use Illuminate\Contracts\Queue\ShouldQueue;

class customMail extends Mailable
{
    use Queueable, SerializesModels;

    public function __construct()
    {
    }

    public function build()
    {
      return $this->view('view.name');
    }
}
Mail Blade Template
Laravel supports custom blade template for mails which you can define via the view() method inside the build() method of mailable class. Make sure that you add all the styles inline in that template or else those styles won't be applied in the mails. Here, we've added a blade template named Helloworld.
public function build()
{
    return $this->view('mails.HelloWorld');
}
Define Subject of the Mail
You can also define the subject of your mail via subject() method inside the build() method. Laravel tends to take up the mailable class name as default subject of your mail.
public function build()
{
    return $this->subject('Hello World')->view('mails.HelloWorld');
}
Send Mail
Now, you can simply instantiate the mailable class in your controller form where you are sending the mail after adding the namespaces on the top.
use Mail;
use App\Mail\customMail;

public function sendMail(Request $request){
    $email = $request->email;
    Mail::to($email)->send(new customMail());

    if( count(Mail::failures()) > 0 ){
        session::flash('message','There seems to be a problem. Please try again in a while');
       return redirect()->back();
    }else{
        session::flash('message','Thanks for your message. Please check your mail for more details!');
        return redirect()->back();
    }
}
Here, $request is assumed to hold the data being sent to the controller that holds the email address of the receiver. It's good to verify if the mail is sent or not via the application so we added a little more blocks of codes to check if any error occurs in the process while redirect()->back() redirects user back to the same page from where the mail function is initialized..
How to check if an email exists?
If you are working on the registration process of an user, it's much better to send a link in the email template and validate the user once he clicks that link. That'll ensure that the email address provided by the user exists in real.
How to include receiver details as variables in mail?
Sending a personlized email would be more appealing to the receiver rather than the plain one when we want to make them carry out some tasks via that email which may be completing the registration or confirming subscription or anything else.
Simply, go to your mailable class and add use Illuminate\Http\Request on the top as shown below.
namespace App\Mail;

use Illuminate\Bus\Queueable;
use Illuminate\Mail\Mailable;
use Illuminate\Queue\SerializesModels;
use Illuminate\Contracts\Queue\ShouldQueue;
use Illuminate\Http\Request;
Now, you can use the variables from the form that is used to initialize this mailable class with a little modification in your build() method.
public function build(request $request)
{
    return $this->subject('Hello World')->view('mails.HelloWorld',['request'=>$request]);
}
You can even declare the values you need individually here like 'receiver' =>$request->receiver but it'll be more easier to use it in the mail blade as shown below.
Thank you Mr/Ms {{ $request->receiver }}
More texts as required ...
Leave a comment